Real Estate Agent specializing in helping you Sell and Buy homes. First home time buyers, residential single family homes, lake and luxury homes, vacant land. Seving the greater Milwaukee Metro area including: Waukesha County, Lake Country, Jefferson, Dodge, Washington, Walworth, and Milwaukee Counties. I offer online markets, LISTING PACKAGES, MLS Search access, Buyer Agency, all with outstanding service.
Contact your local RE/MAX Realty Center Agent Stacey Guzanick 262.490.3696, Guzanick@gmail.com, if you have questions about buying a house or selling one. I can guide you toward your next home.
Contact your local RE/MAX Realty Center Agent Stacey Guzanick 262.490.3696, Guzanick@gmail.com, if you have questions about buying a house or selling one. I can guide you toward your next home.
Winter’s doldrums got you down? Grab a screwdriver and a hammer and fight back with easy home repairs that’ll raise spirits and get your house ready for spring.
Squeaky wood floors? Quiet creaks by dusting talcum powder into the seam between the floorboards. Image: Libby Walker for HouseLogic
Accomplishments — even little ones — go a long way toward a sunny outlook. Fortunately, there are plenty of easy, quick home repair chores you can do when you’re mired in the thick of winter. For max efficiency, make a to-do list ahead of time and shop for all the tools and supplies in one trip. On your work days, put the basics in a caddy and carry it from room to room, checking off completed tasks as you speed through them.
What to Look (and Listen) For
In each room, look around and take stock of what needs fixing or improving. Focus on small, quick-hit changes, not major redos. Here are some likely suspects:
1. Sagging towel rack or wobbly toilet tissue holder. Unscrew the fixture and look for the culprit. It’s probably a wimpy, push-in type plastic drywall anchor. Pull that out (or just poke it through the wall) and replace it with something more substantial. Toggle bolts are strongest, and threaded types such as E-Z Ancor are easy to install.
2. Squeaky door hinges. Eliminate squeaks by squirting a puff of powdered graphite ($2.50 for a 3-gram tube) alongside the pin where the hinge turns. If the door sticks, plane off a bit of the wood, then touch up the paint so the surgery isn’t noticeable.
3. Creaky floor boards. They’ll shush if you fasten them down better. Anti-squeak repair kits, such as Squeeeeek No More ($23), feature specially designed screws that are easy to conceal. A low-cost alternative: Dust a little talcum powder into the seam where floorboards meet — the talcum acts as a lubricant to quiet boards that rub against each other.
4. Rusty shutoff valves. Check under sinks and behind toilets for the shutoff valves on your water supply lines. These little-used valves may slowly rust in place over time, and might not work when you need them most. Keep them operating by putting a little machine oil or WD-40 on the handle shafts. Twist the handles back and forth to work the oil into the threads. If they won’t budge, give the oil a couple of hours to penetrate, and try again.
5. Blistered paint on shower ceilings. This area gets a lot of heat and moisture that stresses paint finishes. Scrape off old paint and recoat, using a high-quality exterior-grade paint. Also, be sure everyone uses the bathroom vent when showering to help get rid of excess moisture.
6. Loose handles or hinges on furniture, cabinets, and doors. You can probably fix these with a few quick turns of a screwdriver. But if a screw just spins in place, try making the hole fit the screw better by stuffing in a toothpick coated with glue, or switching to a larger screw.
Safety Items
You know those routine safety checks you keep meaning to do but never have the time? Now’s the time.
7. Carbon monoxide and smoke detectors. If you don’t like waking up to the annoying chirp of smoke detector batteries as they wear down, do what many fire departments recommend and simply replace all of them at the same time once a year.
8. Ground-fault circuit interrupter (GFCI) outlets. You’re supposed to test them once a month, but who does? Now’s a great time. You’ll find them around potentially wet areas — building codes specify GFCI outlets in bathrooms, kitchens, and for outdoor receptacles. Make sure the device trips and resets correctly. If you find a faulty outlet, replace it or get an electrician to do it for $75 to $100.
Another good project is to replace your GFCIs with the latest generation of protected outlets that test themselves, such as Levitron’s SmartlockPro Self-Test GFCI ($28). You won’t have to manually test ever again!
9. Exhaust filter for the kitchen stove. By washing it to remove grease, you’ll increase the efficiency of your exhaust vent; plus, if a kitchen stovetop fire breaks out, this will help keep the flames from spreading.
10. Clothes dryer vent. Pull the dryer out from the wall, disconnect the vent pipe, and vacuum lint out of the pipe and the place where it connects to the machine. Also, wipe lint off your exterior dryer vent so the flap opens and closes easily. (You’ll need to go outside for that, but it’s quick.) Remember that vents clogged with old dryer lint are a leading cause of house fires.
11. Drain hoses. Inspect your clothes washer, dishwasher, and icemaker. If you see any cracks or drips, replace the hose so you don’t come home to a flood one day.
12. Electrical cords. Replace any that are brittle, cracked, or have damaged plugs. If you’re using extension cords, see if you can eliminate them — for example, by replacing that too-short lamp cord with one that’s longer. If you don’t feel up to rewiring the lamp yourself, drop it off at a repair shop as you head out to shop for your repair materials. It might not be ready by the end of the day. But, hey, one half-done repair that you can’t check off is no big deal, right?
Contact your local RE/MAX Realty Center Agent Stacey Guzanick 262.490.3696, Guzanick@gmail.com, if you have questions about buying a house or selling one. I can guide you toward your next home.
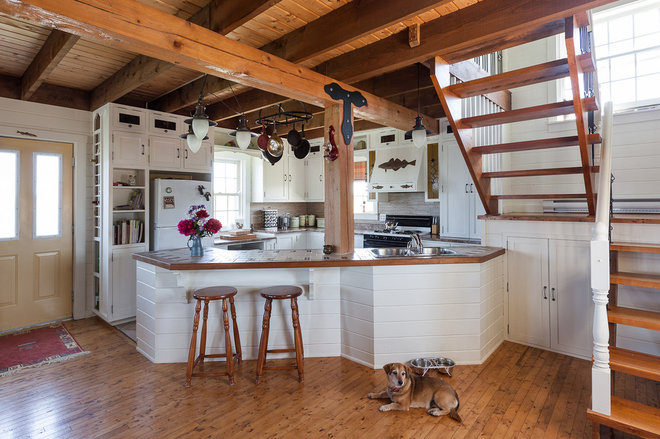
Open vs. Closed Kitchens — Which Style Works Best for You?
For centuries the kitchen was strictly a work space. Often tucked in the back of the house, it had room for just the bare essentials. But a peek at many new kitchens today reveals a very different approach: the open-concept kitchen at the heart of the home.
"The kitchen was really a closed-off spot for a long time," says John Petrie, president-elect of the National Kitchen & Bath Association. "Now people want the kitchen to be an active part of the family home." Although open-concept kitchens are by far the more popular choice today, some homeowners are embracing elements of the past — namely a separate, more closed-off layout. Could we be shifting back to the kitchens of yesteryear?
We asked three kitchen experts for their thoughts on the two kitchen styles, and how you can decide which one is right for you.
Twenty years ago the term "cocooning" arose in the home design world. Home life shifted as people spent more time at home. "Home was a safe place, a refuge and where you wanted to be," says Petrie.
The desire for a cocoon fueled the open-concept kitchen, allowing homeowners to spend more time with family and friends while cooking and cleaning. "It also showcased a shift to a more casual lifestyle," says Andrea Dixon of Fiddlehead Design Group. "People weren't afraid to expose reality — i.e., a messy kitchen."
"When the walls came down, the kitchen became an integral part of the home," says Petrie. Kitchens soon became the center of the house — the room that everything else revolved around.
Today this layout has become the go-to kitchen style, particularly for families. The combined layout allows for optimum multitasking — parents can prepare dinner, watch the news and help with homework at the same time. "I'm a huge open-concept-kitchen fan," says Anthony Carrino of Brunelleschi Construction. "I find that the benefits far outweigh those of throwing the kitchen into another room. Ninety-nine percent of our clients ask for an open-concept kitchen."
The kitchen is already the most expensive room in the house to remodel, and turning a closed kitchen into an open plan can add to the cost. Tearing down walls means dealing with plumbing, electrical and structural work on a huge scale. Sometimes the added expense means compromising in other areas.
For homeowners who'd rather invest in other parts of their kitchen — appliances, materials or cabinetry — reworking the layout may not be worth it. "You have to think about what's best for you," says Petrie. When it comes to allocating your kitchen budget, which is more important, he asks, "an efficient, functional kitchen with better appliances? Or an open layout that connects to the rest of your home?"
While most of Dixon's clients ask for open-concept kitchens, some prefer a closed-off space. "There will always be some people who are uncomfortable with letting guests see their 'unmentionables,'" she says. "It's definitely a more formal layout, but it ultimately comes down to personal preference."
If you want to leave your smells and mess behind when serving meals, a closed layout could be for you.
"You can get creative with a closed kitchen, too," says Carrino. If space allows, a small booth, fold-down table or rolling bar can make a closed kitchen more of a social space.
Of course, a closed-off kitchen's isolation also can be its main downfall. This layout doesn't allow for direct access from the kitchen to the dining table, or vice versa. And it's difficult to interact with friends and family while whipping up meals, since most of the room is reserved for the work triangle.
There's no set formula that can tell you which kitchen layout will work better in your home. Part of having a conversation with a designer is trying to figure out what's best for you. Start with a list of needs and wants, and go from there. "You've got to consider the way you live in your home and the way you use your home," says Carrino. "How do you use your kitchen? How do you foresee using your new kitchen?"
Everyone's needs are different, so don't let yourself sway with trends. "A family with kids that need supervision might decide to do an open-concept plan with a large multifunctional island," says Dixon. "But a couple who loves to entertain might opt for a closed-concept space so they can prep courses ahead of time and not spoil the surprise. It totally depends on your lifestyle."
Tell us: Do you have a closed or open kitchen? Is there anything you'd change about your kitchen layout?
Contact your local RE/MAX Realty Center Agent Stacey Guzanick 262.490.3696, Guzanick@gmail.com, if you have questions about buying a house or selling one. I can guide you toward your next home.
Contact your local RE/MAX Realty Center Agent Stacey Guzanick 262.490.3696, Guzanick@gmail.com, if you have questions about buying a house or selling one. I can guide you toward your next home.
High-end real estate is booming. About 9 percent of U.S. buyers bought homes priced at $500,000 and above last year, up from 6 percent in 2010, according to the National Association of REALTORS®’Profile of Home Buyers and Sellers.
But it takes more than a pricey marketing campaign or rubbing elbows with luxury specialists to succeed in high-end sales, defined by realtor.com® as an entry point between $500,000 and $1 million depending on the region. Unrivaled market expertise and impeccable customer service are core principles that should be mastered. Here’s how three practitioners put these fundamentals to work.
The Condo Queen
Karen Rodriguez, a salesperson with Dorsey Alston, REALTORS®, has cultivated her business in Atlanta’s prestigious Buckhead neighborhood over the past 11 years. As she landed more and more higher-priced condo sales, developers took notice. In December 2013, Rodriguez won an exclusive agreement to handle sales at The Residences at Mandarin Oriental where she has sold eight units (as of September), with a total volume of $16 million.
Rodriguez targets other high-end buildings in downtown Atlanta with direct mailings and advertises in The New York Times and The Wall Street Journal. Because her buyers are financially savvy and detail oriented, they want to understand the developer’s financial picture as well as the story behind the building. She provides it all, sending her clients home with numerous pictures and handouts. Her sales team also posts professional photos of their staged listings on Pinterest. Whether or not prospective buyers are on Pinterest, their designers and decorators are, and they’ve been a rich source of buyer leads.
The Resident Expert
Over the past 17 years, Minneapolis-based sales associate Gary Bennett with RE/MAX Results has been inside the vast majority of homes in the Lowery Hill and Kenwood neighborhoods—an area with some of the Twin Cities’ most sought-after luxury properties.
Bennett’s familiarity with the housing stock, his nearly two decades as a resident, and his background in older home renovations (he has restored three homes in the area) have propelled his success. Entry-level prices in his market are between $750,000 and $1 million.
Bennett’s remodeling experience enables him to advise clients on how new projects will factor into the price. Dated kitchens or bathrooms will kill a sale, he says. Bennett finds success with direct mail campaigns, which other practitioners abandoned during the recession. “You just can’t survive online; this is a people business,” Bennett says. “I’ve taken calls from people gearing up for next year directly related to those mailings.”
The Savvy Developer
Carlos Tosca, who cofounded Palmcorp Development Group in 2009, builds homes in Miami with prices ranging from $699,000 to $4.5 million. He saw an opportunity when little was being built right after the recession. That first year, his company did 80 percent rehabs and 20 percent new construction—but after that, the new construction side took off.
Tosca and his partner, Gus De Ribeaux, offer spec homes that include customizable features for virtually every aspect of the design. They add amenities high-end buyers desire, including open floor plans and energy efficient systems, which are features most pre-2006 builds didn’t include. They deliver fast, too—within eight months, while other luxury developments can take two years or longer. “As soon as we saw it was working, we raised capital and we abandoned rehabs completely in 2010,” he says. In 2013, Palmcorp delivered $13 million in home sales, and Tosca’s projecting $24 million for 2014.
Contact your local RE/MAX Realty Center Agent Stacey Guzanick 262.490.3696, Guzanick@gmail.com, if you have questions about buying a house or selling one. I can guide you toward your next home.
Image courtesy of Utopian Landscapes/Christmas Décor, a member of PLANET
It’s that time of year where home owners are busy decorating their exteriors with holiday lights and making them for festival for the holidays. Many landscape and lawn care companies support their clients year-round by providing snow removal and holiday lighting in the winter. There are many safety concerns that home owners should take into consideration when putting up their own holiday lights, such as:
1. Inspect the lights and wires.
Inspect all lights, decorations and extension cords before using. Wires can become brittle.Throw lights away if there is exposed copper or broken sockets.
2. Don’t overload circuits and watch for electrical concerns.
Avoid connecting five or more strands end to end, otherwise the circuit can be overloaded. However, for many LEDs you can add more than five strands. Also, do not pull the strands too tight so they can reach an outlet. Other electrical concerns to watch for:
Tears in the wiring surface could result in electrocution.
When creating a lighting configuration on a lawn, make sure to keep connections out of depressions that could collect ground water.
Be sure to tape down extension cords if they cross walkways.
3. Read the labels carefully for outdoor use.
LED lights re more energy efficient and require less wattage than incandescent bulbs. But make sure the lights and extension cords are rated for indoor and outdoor use or specifically for outdoor use. Outdoor lights should be plugged into circuits protected by ground fault circuit interrupters (GFCIs.). Also, don’t replace light bulbs without unplugging the light strand or decoration.
4. Take caution on rooftops or elevated areas.
Ladders should be inspected – look for lose or missing screws, hinges, bolts and nuts before using and be sure they are stable and in good condition. Be sure to ground the ladder on a solid, even surface with no risk of sliding.
Don’t overreach when on ladders. When stringing lights, climb down and move the ladder often. Also, keep ladders as far as possible from electrical lines. Finally, if the roof is too steep or too high, don’t risk scaling it and endangering yourself. Hire a trained landscape professional that has the training to offer unique installation methods and premium quality products with the latest trends in decoration and technology.
5. Remove lights at the end of the holiday season. Over a period of time, lights exposed to the weather can have damage to the wires, lights, and sockets. Watch for any weather damage before you tow the lights away for next year.
Contact your local RE/MAX Realty Center Agent Stacey Guzanick 262.490.3696, Guzanick@gmail.com, if you have questions about buying a house or selling one. I can guide you toward your next home.